Welcome to my TAT IT AND SEE, Day 1
copyright Diane M. Saunders 1997, 2000
Thanks to Jane Eborall for her "Tat It and See" idea.
Here's my attempt at doing a "Tat It and See," and my way of thanking Jane for hers.
Thread amounts I needed to make this piece:
Size 20: Wind S1 with at least 3 yds and S2 with at least 3-1/3 yds, CTM
Size 40: Wind S1 with at least 8 ft and S2 with at least 8 ft, CTM
(I'm using Manuela, size 20, because I thought this color would photograph well.)
In my patterns, the first column indicates which shuttle I hold in my right hand (I'm left-handed but tat right-handed).
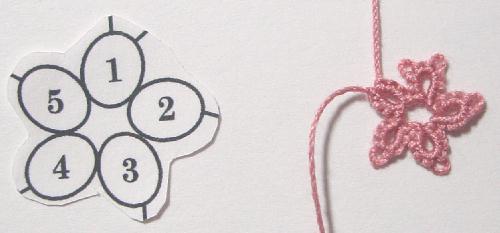
The second column is the ring number, shown in the diagram, and whether or not it's a split ring.
The third column is the pattern for the ring, etc. (what follows the ring, up to the next ring).
Pattern for today:
Abbreviations I use:
C = chain
CTM = continuous thread method
DNRW = do not reverse work
R1, R2, etc. = ring 1, ring 2, etc.
RW = reverse work (top to bottom, like lowering/raising a tailgate)
S1, S2, etc. = shuttle 1, shuttle 2, etc. (this refers to the shuttle held in your hand;
keep using the shuttle indicated until it is changed)
SR = split ring
- = very small picot, the width of 1 ds (but still large enough to join into)
-- = small picot, the width of 2 ds
--- = longer picot, the width of 3 ds, etc.
+ = join: regular join
+L = join: Lock join
/ = separates the first half, or part, of a SR from the second part
Note on closing rings: I do not include this in my patterns; just close all rings unless it says otherwise.
Back to my home page: http://www.LoveTatting.com
This page was created 1-25-2008 and last updated 2-10-2008